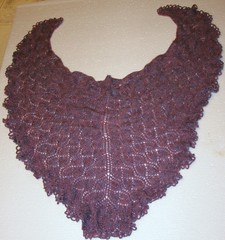
The stitch pattern for Dorothy has an interesting (and sometimes annoying) feature. The stitch pattern I used is mostly patterned on the right side, but every 12 rows there are decreases on the wrong side. This feature makes for a slow going, as it's hard to get the rhythm of the pattern. I found myself forgetting about those purled decreases more often than not.
Here's a solution I came up with to avoid tinking back every time I forgot the darn decreases. You're happily knitting along, beginning to think you're memorizing the pattern, get to the next right side row aaaaaaaaaaaand...the stitch count is off. You count, recount, freak out (you know the drill), think about PMing me, posting it to the group and then you check the charts and realize you forgot the decreases on the previous row. Shoot!
The mistake can be seen inside the red circles on the image above. What to do? The first reaction is to tink back, redo the last wrong side row (paying attention this time) and move on. That is all fine and dandy when you're on the first or second repeat, but what happens when you're already 10 repeats into the pattern and you had to tink back 6 of those??? It happened to me and I got tired of tinking so I came up with a patch.
Showing posts with label tutorial. Show all posts
Monday, May 23, 2011
Tuesday, May 03, 2011
How to block Dorothy
Dorothy might be a bit of a problem when it comes to blocking, so I decided to write a tutorial showing the most important steps. This is a very image heavy post, so I decided to go with smaller pics here. The photos are all linked to my Flickr, so if you need to see more details, just click on them.

First of all, we need a flat, "pin-able" surface, a bunch of pins and a spray bottle. Since I knit from a cone, I soaked the shawl in very hot water with some shampoo in it (to take the sizing off the yarn) over night. I then put Dorothy through the spin cycle of my washer to take the excess water out and placed it over my surface in the approximate shape it would have after blocked:

First of all, we need a flat, "pin-able" surface, a bunch of pins and a spray bottle. Since I knit from a cone, I soaked the shawl in very hot water with some shampoo in it (to take the sizing off the yarn) over night. I then put Dorothy through the spin cycle of my washer to take the excess water out and placed it over my surface in the approximate shape it would have after blocked:
Monday, February 14, 2011
A PPaola to dye for - a tutorial
I know...it's been a long time since I last wrote here. I was busy with a very welcome commission and then nursing a cold - such a bad one I didn't even want to knit!
Anyway, I had promised the test knitters that once we were done with PPaola, I'd post a tutorial on how to dye the finished stole. The photos were taken some time ago, but like I said, I was busy doing some other (not so fun) things.
Here is the image of the second PPaola I knit. It was done with Franklin sock yarn, using AB beads instead of nupps. (I tried everything I could think of, but blogger insists on placing the image sideways). You can find the specs for this one here.
This was my first time "painting" a knit item and I probably made a bunch of mistakes, but it was fun and easy to do.
Since it was the dead of winter (and I don't have much space outside anyway), I did all the dyeing on my dinning room table.
You'll need old newspapers and some plastic (I used the real big grocery bags). There were two colors used to get the result you see above - Evergreen and Blue Spruce. I used Country Classic Wool Dyes, but you can use anything you got handy. You'll also need a few jars to put the dyes in and one or two foam brushes.
We'll start by soaking the item in water for at least half an hour. A few tips here: if you used coned yarn to knit your item, you'll probably need to take whatever sizing the used on the yarn off - so, first soak it in very hot water (DO NOT AGITATE!!!). I used a few drops of dish detergent on the water as I wanted the colors to "run" a bit - soap lower the surface tension.
After letting the stole soak for a good time, I made my first mistake: I took the excess water out by using the spinning cycle of my washer...because of that the yarn didn't quite work as a wicker as I wanted it to. If I were to do it again, I'd just squeeze the excess water out with my hands.
On the other hand, by spinning it on the washer I didn't get a big mess of puddles in the carpet ;)
Anyway, I had promised the test knitters that once we were done with PPaola, I'd post a tutorial on how to dye the finished stole. The photos were taken some time ago, but like I said, I was busy doing some other (not so fun) things.
Here is the image of the second PPaola I knit. It was done with Franklin sock yarn, using AB beads instead of nupps. (I tried everything I could think of, but blogger insists on placing the image sideways). You can find the specs for this one here.
This was my first time "painting" a knit item and I probably made a bunch of mistakes, but it was fun and easy to do.
Since it was the dead of winter (and I don't have much space outside anyway), I did all the dyeing on my dinning room table.
You'll need old newspapers and some plastic (I used the real big grocery bags). There were two colors used to get the result you see above - Evergreen and Blue Spruce. I used Country Classic Wool Dyes, but you can use anything you got handy. You'll also need a few jars to put the dyes in and one or two foam brushes.
We'll start by soaking the item in water for at least half an hour. A few tips here: if you used coned yarn to knit your item, you'll probably need to take whatever sizing the used on the yarn off - so, first soak it in very hot water (DO NOT AGITATE!!!). I used a few drops of dish detergent on the water as I wanted the colors to "run" a bit - soap lower the surface tension.
After letting the stole soak for a good time, I made my first mistake: I took the excess water out by using the spinning cycle of my washer...because of that the yarn didn't quite work as a wicker as I wanted it to. If I were to do it again, I'd just squeeze the excess water out with my hands.
On the other hand, by spinning it on the washer I didn't get a big mess of puddles in the carpet ;)
Subscribe to:
Posts (Atom)